Test the Quadrature Clock Generator Stage
Return to Quadrature Clock Generator
Quadrature Clock Generator - Current Draw
With both the USB cable and the power cable plugged in, measure the current draw in the positive power lead.
Measure the current draw with just the 12V power.
Note: the current draw will be slightly higher if you installed U12 as part of an LF option build
Test Steps (if any)
| Step | Test Point | UOM | Nominal | Author's | Builder's |
|---|---|---|---|---|---|
| 0 | Current draw WITH USB | mA | < 18 | 8 | |
| 1 | Current draw NO USB | mA | < 18 | 4 |
Quadrature Clock Generator - Test Voltage Divider
When performing the following tests, you must apply power to the board AND plug in the USB cable. Otherwise, results will not be as expected.
Plug in USB and power the board.
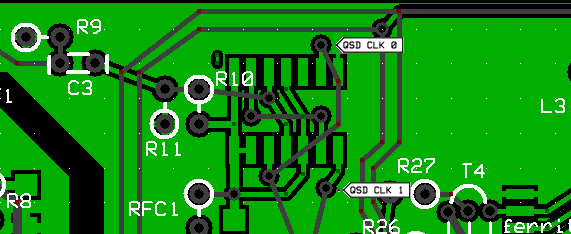
Measure the voltage on the R11 hairpin; you should see 50% of the %v rail voltage.
Depending upon your DMM, your measurements may vary. What we are looking for here is roughly half the 5 volt rail.
Troubleshooting the Voltage Divider
Test Steps (if any)
| Step | Test Point | UOM | Nominal | Author's | Builder's |
|---|---|---|---|---|---|
| 0 | R11 hairpin (WRT regular gnd) | V dc | 2.5 | 2.53 |
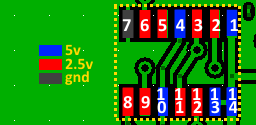
Quadrature Clock Generator - Divider Pin Voltages
Power USB and 12V. Then measure the voltages on the pins (and, separately, on the pads) of U7 (74AC74). Refer to the color codes on the graphic for the voltages.
Pins 3 and 11 will not show exactly 2.5Vdc because they have the additional AC component of the local oscillator signal from C3. The important idea is - for those pins which should nominally be 2.5Vdc - you do NOT want to see 0 or 5 Vdc!
Test Steps (if any)
| Step | Test Point | UOM | Nominal | Author's | Builder's |
|---|---|---|---|---|---|
| 1 | Pin 1 | Vdc | 5 | 5.08 | |
| 2 | Pin 2 | Vdc | 2.5 | 2.53 | |
| 3 | Pin 3 | Vdc | 2 to 3 | 2.53 | |
| 4 | Pin 4 | Vdc | 5 | 5.08 | |
| 5 | Pin 5 | Vdc | 2.5 | 2.54 | |
| 6 | Pin 6 | Vdc | 2.5 | 2.53 | |
| 7 | Pin 7 | Vdc | 0 (GND) | 0 | |
| 8 | Pin 8 | Vdc | 2.5 | 2.53 | |
| 9 | Pin 9 | Vdc | 2.5 | 2.54 | |
| 10 | Pin 10 | Vdc | 5 | 5.08 | |
| 11 | Pin 11 | Vdc | 2.5 | 2.53 | |
| 12 | Pin 12 | Vdc | 2 - 3 | 2.53 | |
| 13 | Pin 13 | Vdc | 5 | 5.08 | |
| 14 | Pin 14 | Vdc | 5 | 5.08 |
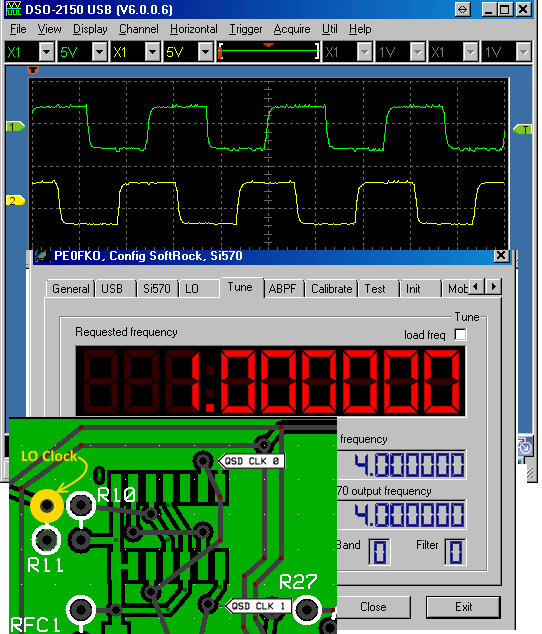
Quadrature Clock Generator - Quadrature Clock Generated Waveforms
Set your board up to oscillate at a selected center frequency, e.g., 1 MHz.
If you have a dual trace scope available, probe the two "QSD CLK (n)" test points and you should get a waveform similar to the one shown here.
The testpoint marked "LO Clock" will provide the Si570's output frequency.
Your mileage may vary, depending upon the desired center frequency you select and the quality of your scope (some scopes tend to have issues with these square waves - still, the scope should show two waveforms in quadrature at the desired center frequency).