Ensemble RXTX - USB Power Supply
Band: 30, 20, 17m
Introduction
General Info About the Stage
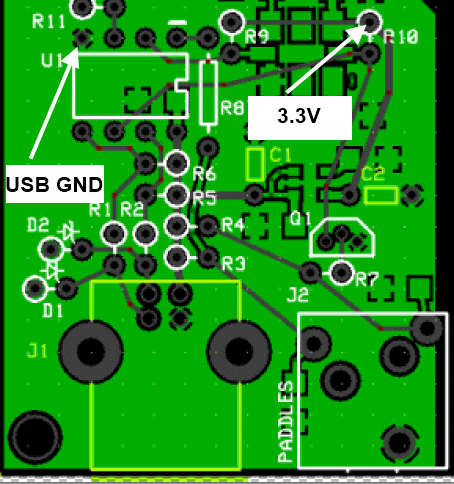
This stage installs the power supplies for the USB section of the board. This section is galvanically isolated from the rest of the board, with its own ground plane (the "USB ground". Voltages measured in this stage are measured with respect to (WRT) this ground and NOT the "regular ground" of the rest of the board. To paraphrase a famous city's motto, "What happens in USB stays in USB!"
This stage installs the USB connection (with its 5 V bus) and the (very tiny) 3.3V regulator whch translates the USB 5 volts to 3.3V for the Si570 and the microcontroller of the next stage..
This stage will present the most difficult SMT soldering challenge to the builder; that voltage regulator is, indeed, tiny! The builder should undertake this stage BEFORE that third cup of coffee and take great pains to avoid launching the little chip off into space (never to be retrieved!)
Chris, KB3CS offered this tip for dispensing the 3.3V regulator ("LFEA"): cut off the corner of folded-over part the bag or cut a small slit in the side of bag (don't remove the staple and unfold!) and then manipulate the bag to 'pour' it into something ESD safe to catch it like one of the cups of a Panavise base.
Theory of Operation
Summary Build Notes
Stage Schematic

Go to Top of Page
Click here for full schematic
(Red dots represent the "hairpin" (or left-hand or topmost) lead of the component)
Board Layouts
Board Top
Go to Top of Page
Board Bottom
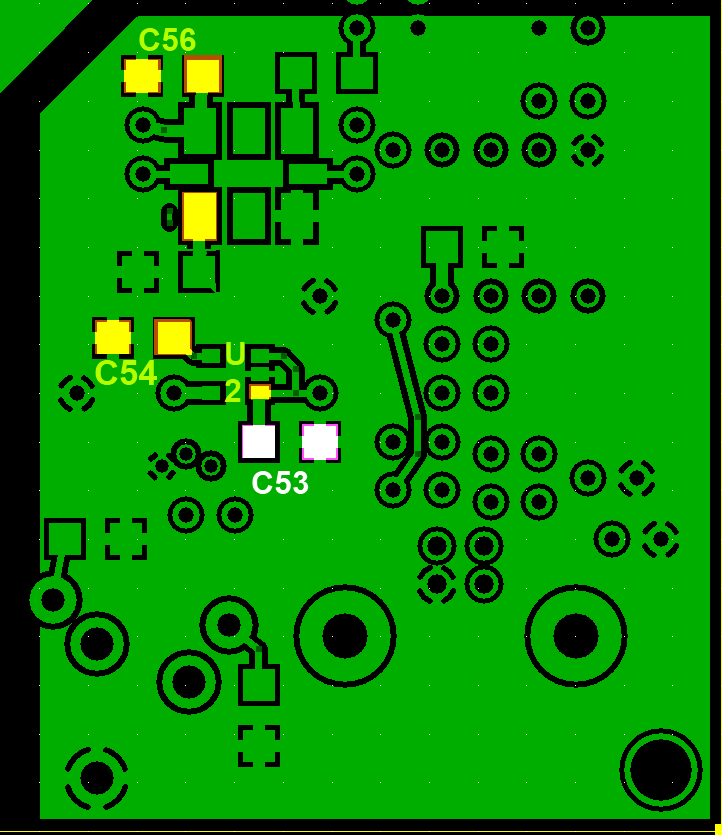
Go to Top of Page
USB Power Supply Bill of Materials
(30, 20, 17m band option)
(details for installation of each component are provided in the step instructions, further down the page)
| Check | Type | Category | Component | Count | Marking | Image |
|---|---|---|---|---|---|---|
| ☐ | Capacitor | SMT 1206 | 0.01 uF | 2 | (smt) no stripe |

|
| ☐ | Capacitor | SMT 1206 | 0.1 uF | 1 | (smt) black stripe |

|
| ☐ | Capacitor | Ceramic | 4.7 uF 10% 16V X7R RAD | 2 | 475 |

|
| ☐ | connector | Jack-RA | USB-B pcb jack (rt-angle) | 1 |

|
|
| ☐ | IC | SOT-23-5 | LP2992AIM5-3.3V regulator | 1 | LFEA ESD!!! |

|
Go to Top of Page
Detailed Build Steps
Step_Install Topside Capacitors
It is advisable to install the two topside capacitors BEFORE installing the voltage regulator, since the holes for those capacitors are dangerously close to the pads for the regulator.
The 3.3V regulator is, indeed, very tiny. It is found in a rolled up and stapled bottom portion of an antistatic bag. You have to look very closely to find it. You do not want to do, as the author did, inadvertently toss the chip out with the little rolled up bag!
Due to some problems with recent lots of Si570 devices, Tony has had to pre-mount the Si570s and test them in circuit before sending the kit out. The circuit boards sent out with the Si570 already mounted have a cut in the trace between the 3.3 volt regulator output and the Si570. This is so that the 3.3 volt supply may be verified to be regulating properly before subjecting the Si570 to an over voltage condition. The cut needs to be bridged by scraping the ends of the trace each side of the cut and then soldering in a short wire to bridge the cutl
Go to Top of Page
Step_Install SMT Components
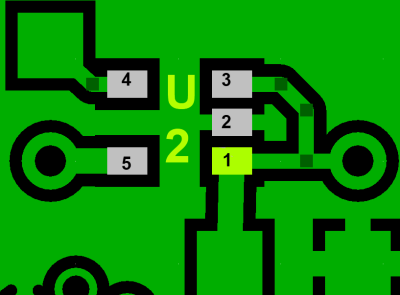
It is advisable to install the two topside capacitors BEFORE installing the voltage regulator, since the holes for those capacitors are dangerously close to the pads for the regulator.
The 3.3 V voltage regulator is a very tiny component and you must take great care in soldering it. Solder bridges are the usual suspects if this stage fails the voltage test. Pin 2 is USB ground and pins 1 and 3 (on either side) are USB 5 V!.
If this is your first attempt at soldering SMT components, please review the materials on the home page for this kit.
The IC (U2) should come in the kit folded into a little "pocket" made from folding over and stapling the bottom portion of the IC bag.
Note, also, that there are two types of SMT capacitors with this kit: o.01 uF and 0.1 uF. Throughout these notes you will find these documented as follows:
| Capacitance | Carrier Strip | Color on Board Bottom |
|---|---|---|
| 0.1 uF (100 nF) | Black Striped | White |
| 0.01 uF (10 nF) | Clear | Yellow |
:
| Check | Designation | Component (top/bottom) | Orientation | Marking | Image | Band | Notes |
|---|---|---|---|---|---|---|---|
| ☐ | U02 | LP2992AIM5-3.3V regulator ((bottom)) | LFEA ESD!!! |
 |
any | ||
| ☐ | C53 | 0.1 uF ((bottom)) | (smt) black stripe |
 |
any | ||
| ☐ | C54 | 0.01 uF ((bottom)) | (smt) no stripe |
 |
any | ||
| ☐ | C56 | 0.01 uF ((bottom)) | (smt) no stripe |
 |
any |
Go to Top of Page
Step_Install Topside Connector
| Check | Designation | Component (top/bottom) | Orientation | Marking | Image | Band | Notes |
|---|---|---|---|---|---|---|---|
| ☐ | C01 | 4.7 uF 10% 16V X7R RAD (top) | 475 |
 |
any | ||
| ☐ | C02 | 4.7 uF 10% 16V X7R RAD (top) | 475 |
 |
any | ||
| ☐ | J1 | USB-B pcb jack (rt-angle) (top) |
 |
any |
Go to Top of Page
Completed Photos
View of Completed Topside
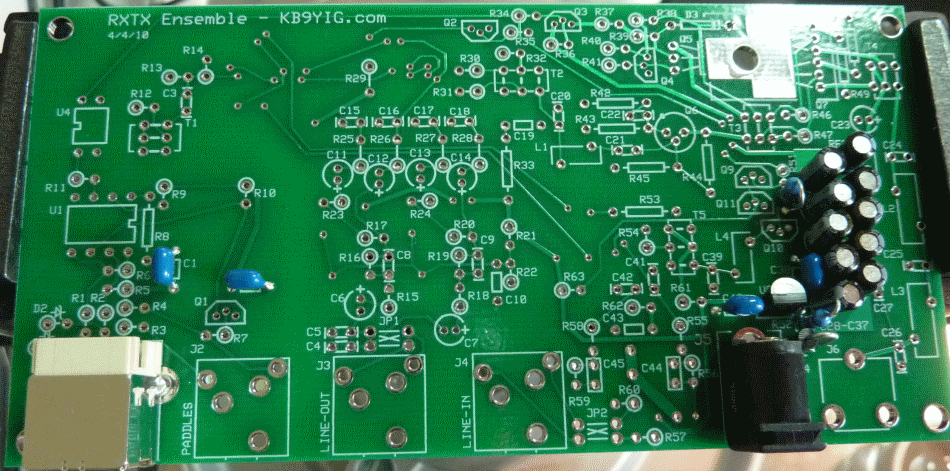
View of Completed Underside
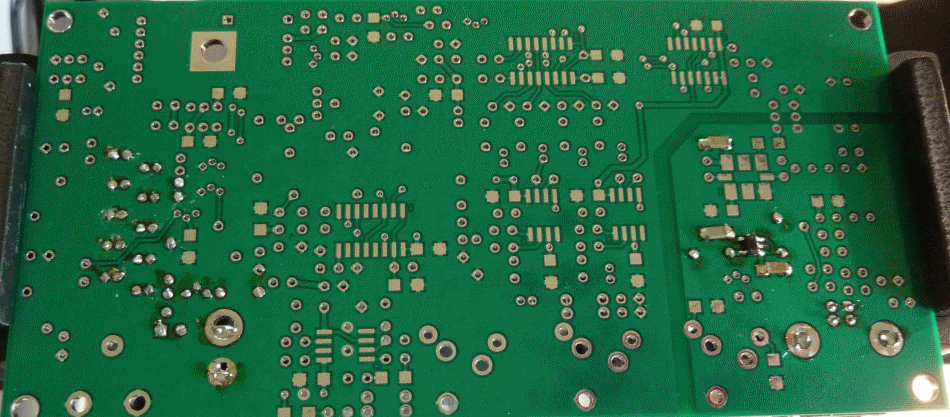
Go to Top of Page
Progressive Schematic
Where are we in our progress towards the finish line? Click here to view the entire schematic with the completed stages shaded in a yellowish tinge and the remaining stages tinted in blue (the current stage is untinted).
Test the USB Power Supply Stage
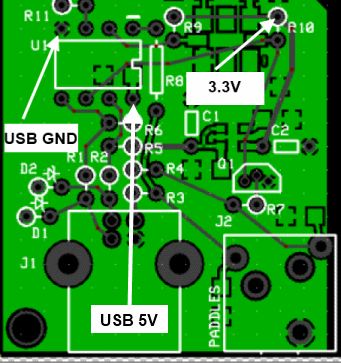
USB Power Supply - Voltage Test
Please note that this voltage is against the galvanically isolated "USB ground". Measurements must be with respect to that ground plane. Conversely, you should see no voltage is measuring with respect to the normal (analog) ground on the rest of the board.
Connect the USB cable to the PC and to the board and measure the voltages (5 and 3.3) at the test points indicated..
For testing, use pin 4 of U1 for a ground
Go to Top of Page
Test Steps (if any)
| Step | Test Point | UOM | Nominal | Author's | Builder's |
|---|---|---|---|---|---|
| 1 | Top lead (hole) of R10 (with respect to USB ground) | Vdc | 3.3 | 3.29 | |
| 2 | Lower right pin (hole) of U1 | Vdc | 5 | 5.08 |
Go to Top of Page