Softrock_40_R BandPass Filter
Band: 20m
Introduction
General Info About the Stage
The challenge in this stage is to successfully wind and install the two inductors, L1 and T1. The most common sources of problems from this stage will be in the soldering of the inductors' leads. If the leads are not well cleaned with the insulation removed and then neatly tinned, cold joints could occur (often very difficult to detect and remedy).
We have a nice set of guidelines for winding and installing inductors. If you have little or no experience in this area, these guidelines are a "must read".
Theory of Operation
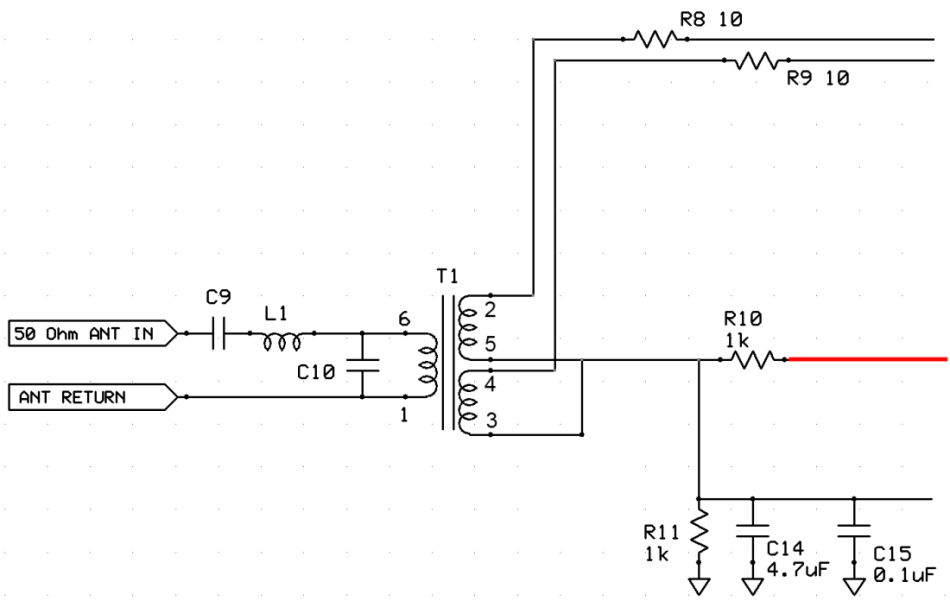
This stage takes in RF from a 50 ohm antenna and filters the RF into a "window" (pass band) on the spectrum that "sees" signals in the 20m band(s) and significantly attenuates all other signals.
Stage Schematic
Go to Top of Page
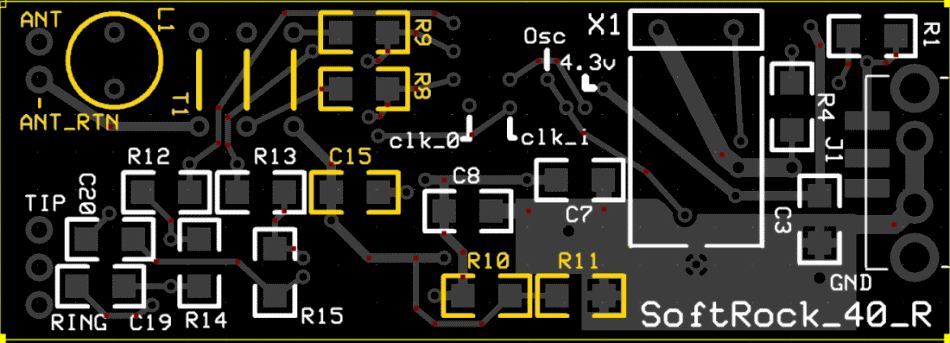
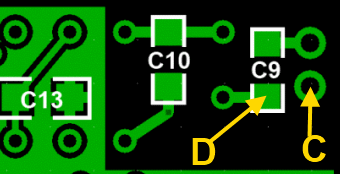
Board Layouts
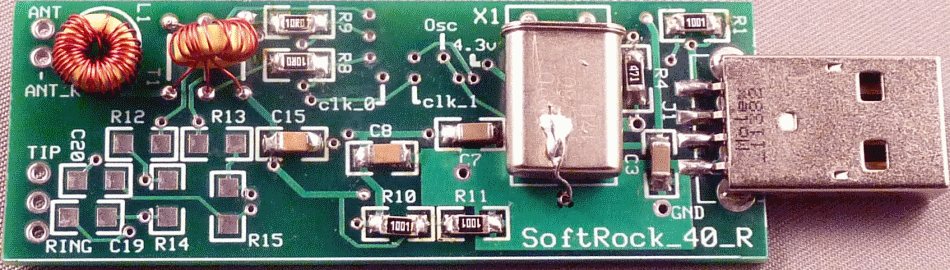
Board Top
Go to Top of Page
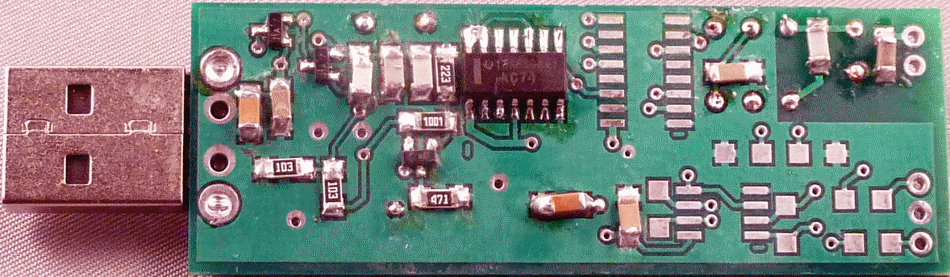
Board Bottom
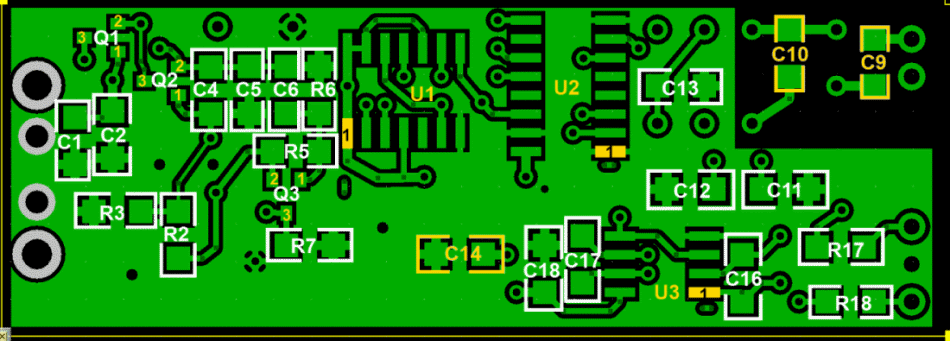
Go to Top of Page
BandPass Filter Bill of Materials
( 20m band option)
(details for installation of each component are provided in the step instructions, further down the page)
Be sure to use the correct wire gauge when winding inductor(s)
| Check | Type | Category | Component | Count | Marking | Image |
|---|---|---|---|---|---|---|
| ☐ | Capacitor | SMT 1206 | 47pF 5% | 1 | in bag |

|
| ☐ | Capacitor | SMT 1206 | 680pF 5% | 1 | in bag |
|
| ☐ | Capacitor | SMT 1206 | 0.1 uF | 1 | (smt) black stripe |

|
| ☐ | Capacitor | SMT 1206 | 4.7uF 20% | 1 | in bag |
|
| ☐ | inductor | Toroid | T25-6 toroid core | 2 | yellow |

|
| ☐ | Inductor | Xfrmr | 0.18uH 8T/2x4T bifilar #30 on T25-6 (yellow) | 1 | yellow | (magnetic wire) |
| ☐ | Inductor | Coil | 2.5uH 30T #30 on T25-6 (yellow) | 1 | yellow | (magnetic wire) |
| ☐ | Resistor | SMT 1206 1/4W | 10 ohm 1% 1/4W | 2 | 10R0 |

|
| ☐ | Resistor | SMT 1206 1/4W | 1k ohm 1% 1/4W | 2 | 1001 |

|
| ☐ | wire | Magnetic | Magnetic Wire, enameled #30 | 1 |
Go to Top of Page
Detailed Build Steps
Wind and Install Inductors
Inductor Information
Common Techniques:
- Wire Gauge: remember the higher the number, the thinner the wire. E.g., #30 wire is thinner than #26 wire.
-
One turn:
- For toroids, one turn is a single pass through the center hole.
- For binocular cores, one turn is a pass in which the wire goes in the bottom, comes out the top, goes back in the other hole at the top, and comes out the other hole at the bottom.
- Bi (tri) filar means 2(3) equal lengths of wire. You get the bi(tri)filar strand by taking the length of wire specified for the primary winding, folding it into half(thirds), twisting it to 3~ twists per inch, and winding it over the primary winding. One end of such a strand will have two(three) leads; the other end will have a "hairpin" bend (and a single lead in the case of tri-filar).
- Multi-filar windings are usually done AFTER the uni-filar winding is done.
- Windings shoud be evenly spaced and ideally made such that the winding covers ~345 degrees of the toroid
- Inductance values given are for the single (uni-filar) winding. They are provided to help verify turn counts and core material selected. It's often reported inductances are higher using the theoretical number of turns as calculated by the manufacturer's windings calculator tool, e.g. http://toroids.info/. Normally though these are not too critical, especially with the LF bands antenna noise will still be seen.
-
Toroid nomenclature provides the outside diameter of the toroid (in hundredths
of an inch - the "30" in "T30-2"), and material code (the "2" in "T30-2").
Color codes used in these kits are:
- 2=Red
- 3=Gray
- 6=Yellow
- 7=White
- 10=Black
- 12=Green (with White on opposite side)
Inductors In This Step
L01COIL: 2.5uH 30T #30 on T25-6 (yellow)
Using approximately 14 inches of #30 wire, wind 30 turns on a 0.25 inch od T25-6 (yellow) ferrite. Inductance = 2.50 uH.
XFRMR: 0.18uH 8T/2x4T bifilar #30 on T25-6 (yellow)
Primary: Using approximately 6 inches of #30 wire, wind 8 turns on a 0.25 inch od T25-6 (yellow) ferrite.
Secondary: Using a total of 6 inches of #30 wire, wind 4 turns , bifilar, on the ferrite in the same direction as the primary winding. Inductance of the single winding (usually the primary) is 0.18 uH.

For guidance on how to wind and install the toroidal transformer, see this page (http://www.wb5rvz.com/sdr/common/Common_Component_Mounting.htm#toroid_xfrmrs)
For guidance on winding and installing toroidal coils (e.g. L1), see this page. (http://www.wb5rvz.com/sdr/common/Common_Component_Mounting.htm#toroid_coils)
Once you have completed this step (including installation of R8 and R9), you want to run continuity tests on the windings.
T1 Secondaries
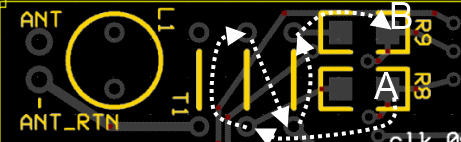
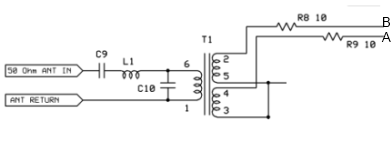
Use an ohmmeter to check the resistance from point "A" to point "B". You should see 20 ohms (R8 and R9 are in series through the center-tapped secondary windings)
L1 and T1-Primary
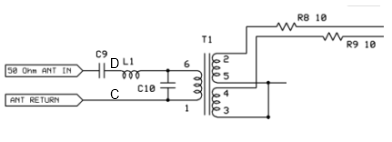
(image is of underside)
Use an ohmmeter to test continuity from point "D" (junction C9/L1) and point "C" (ANT Return). We should see zero ohms on this path through L1 and thence through T1-Primary.
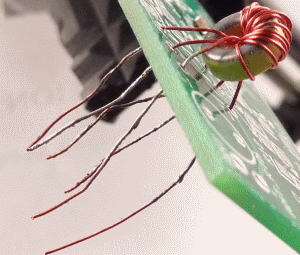
Here is a picture of T1 being installed:
| Check | Designation | Component | top/Bottom | Marking | Image | Band | |
|---|---|---|---|---|---|---|---|
| ☐ | T01-C | T25-6 toroid core (top) | yellow |
|
20m | ||
| ☐ | T01 | 0.18uH 8T/2x4T bifilar #30 on T25-6 (yellow) (top) | yellow |
 |
20m | ||
| ☐ | L01 | 2.5uH 30T #30 on T25-6 (yellow) (top) | yellow |
|
20m | ||
| ☐ | L01-C | T25-6 toroid core (top) | yellow |
|
20m | ||
| ☐ | R08 | 10 ohm 1% 1/4W (top) | 10R0 |
|
any | ||
| ☐ | R09 | 10 ohm 1% 1/4W (top) | 10R0 |
|
any | ||
| ☐ | wire | Magnetic Wire, enameled #30 (top) | any |
Install Voltage Divider
| Check | Designation | Component | top/Bottom | Marking | Image | Band | |
|---|---|---|---|---|---|---|---|
| ☐ | C15 | 0.1 uF (top) | (smt) black stripe |
|
any | ||
| ☐ | R10 | 1k ohm 1% 1/4W (top) | 1001 |
|
any | ||
| ☐ | R11 | 1k ohm 1% 1/4W (top) | 1001 |
|
any |
Install Underside Components
Careful with C14. It is pretty fat for an SMT cap and its conmnection with the ground pad can easily go the cold solder joint route.
| Check | Designation | Component | top/Bottom | Marking | Image | Band | |
|---|---|---|---|---|---|---|---|
| ☐ | C09 | 47pF 5% ((bottom)) | in bag |
|
20m | ||
| ☐ | C10 | 680pF 5% ((bottom)) | in bag |
|
20m | ||
| ☐ | C14 | 4.7uF 20% ((bottom)) | in bag |
|
any |
Completed Photos
Note: the completed pictures are of the 20m option, which the author built. Other band options (which the author did not build) will appear slightly different (especially the inductors, whose windings and cores will vary by band) for the band-specific components.
View of Completed Topside
View of Completed Underside
Go to Top of Page
Testing
Overview
Before doing any testing, use a bright light and good magnification to verify correct soldering. Soldering problems are the greatest cause of test failures. Pay particular attention to the leads of the inductors. One of the most common causes of poor or non-performance on Softrocks is the soldering of the inductor leads. If they are not carefully cleaned and tinned, the joints will appear to be soldered but will in fact be a cold solder joint. Bye-bye sensitivity!
USB Rail Integrity Test
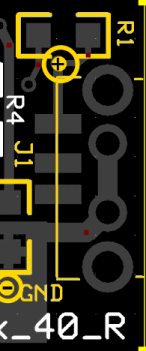
Before powering up, check the resistance across the 5V USB connections (pins 1 (5V) and 4 (gnd) of J1). If you get something very close to zero, you may have introduced a short and the possibility of "frying" your PC's USB Power Bus.
Voltage Tests

R10 and R11 form a voltage divider to provide the bias to the OpAmp stage. The divider produces 50% of Vcc (approximately 2.15 Vdc) at the junction of R10 and R11.
Connect the USB Plug to a USB (power) source. Measure the voltages (WRT ground) at the testpoints indicated in the above figure.
Test Table
| Seq | Test Point | Units | Nominal Value |
Author's Value | Your Value |
|---|---|---|---|---|---|
| 1 ☐ | A | Vdc | 2.15 | 2.11 | ___________ |